Apache Flink Stateful Streaming
Today, We will create simple Apache Flink stateful streaming word count application to show you up how powerful apis it has and easy to write stateful applications. Stream processing is one of the most important component of modern data driven application pipelines. There is a nice article here which is more about the use cases, stateful term definitions and business values of it. In this article I want to focus more on stateful scenario .

Flink Architecture Comparison with Traditional Pipelines
This picture shows really nice how its architecture differs from traditional application pipelines.
There are not many examples to the Flink on the internet. That’s why I decided to write this article. Especially, for the stateful streaming part, tons of papers are around… Okay it’s enough for the intro, let’s get hands on dirty…
Sample Scenario
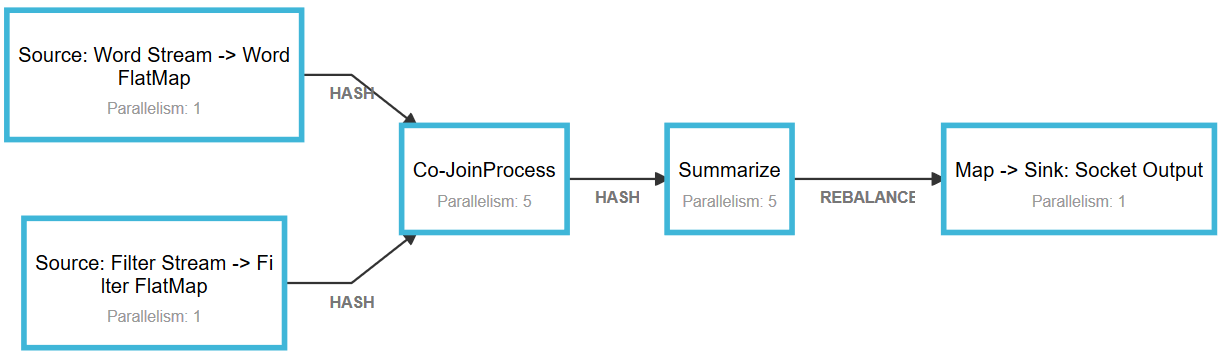
In this example, I will create word count stream analytics pipeline which has two inputs that are used for data ingestion and dynamic filtering. While one input ingests stream of words, the other sets the filtering criteria of the the pipeline dynamically. The input filter stream updates the current state in the co-process function where our logic is implemented. After joining two streams together, the co-process function applies filtering condition based on the state updated with the input filter stream. Afterwards, we’ll apply sliding window function that has 5 seconds size with 1 second sliding interval. The result of all this pipeline goes into one output sink which is tcp socket connection in our case.
Project Setup
You can set up Flink environment quickly by visiting this link.After you complete that step, we are ready to create our project. I’ll use maven quick start template
$mvn archetype:generate -DarchetypeGroupId=org.apache.flink \
-DarchetypeArtifactId=flink-quickstart-java \
-DarchetypeVersion=1.6.0 \
-DgroupId=com-streaming-example \
-DartifactId=com-streaming-example \
-Dversion=1.0 \
-Dpackage=com.sinanbir.example
After this step, our project basic structure will be ready for us.
We will be using Rocks Db state backend. It’s not added as a default package in quick start template. So, to use this package you should add it to your dependencies by adding following line into pom.xml
<dependencies>
...
<dependency>
<groupId>org.apache.flink</groupId>
<artifactId>flink-statebackend-rocksdb_2.11</artifactId>
<version>1.6-SNAPSHOT</version>
</dependency>
...
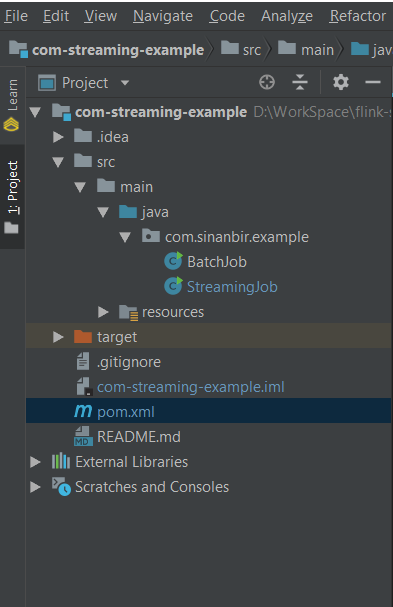
</dependencies>After we complete the setup above. The project structure will be like in the picture.
Application Code
public class StreamingJob{

	public static void main(String[] args) throws Exception{

		final ParameterTool params = ParameterTool.fromArgs(args);
		int portWordStream = params.getInt("portStream");
		int portFilterStream = params.getInt("portFilterStream");
		int portSink = params.getInt("portSink");
		String stateDir = params.get("stateDir");
		String socketHost = params.get("host");

		final StreamExecutionEnvironment env = StreamExecutionEnvironment.getExecutionEnvironment();
		env.setStreamTimeCharacteristic(TimeCharacteristic.ProcessingTime);
		env.setStateBackend(new RocksDBStateBackend(stateDir, false));
		env.enableCheckpointing(2000);// start a checkpoint every 2seconds
		CheckpointConfig config = env.getCheckpointConfig();
		config.setCheckpointingMode(CheckpointingMode.EXACTLY_ONCE);// set mode to exactly-once (this is the default)
		config.enableExternalizedCheckpoints(CheckpointConfig.ExternalizedCheckpointCleanup.RETAIN_ON_CANCELLATION);

		DataStream<Tuple2<String,Integer>> wordStream = env
				.socketTextStream(socketHost, portWordStream).name("Word Stream")
				.setParallelism(1)
				.flatMap(new WordStreamParser()).name("Word FlatMap")
				.keyBy(0);

		DataStream<Tuple2<String,Boolean>> filterStream = env
				.socketTextStream(socketHost, portFilterStream).name("Filter Stream")
				.setParallelism(1)
				.flatMap(new FilterStreamParser()).name("Filter FlatMap")
				.keyBy(0);

		DataStream<Tuple2<String,Integer>> joinedStream = wordStream
				.connect(filterStream)
				.process(new JoinProcessFunction()).setParallelism(5).uid("join-1").name("Co-JoinProcess")
				.keyBy(0)
				.window(SlidingProcessingTimeWindows.of(Time.seconds(5), Time.seconds(1)))
				.sum(1).name("Summarize")
				.setParallelism(5);

		joinedStream.map((MapFunction<Tuple2<String,Integer>,String>)input -> String.format("%tT | %s Count: %d\n", LocalDateTime.now(), input.f0, input.f1))
				.returns(String.class)
				.writeToSocket(socketHost, portSink, new SimpleStringSchema())
				.setParallelism(1)
				.name("Socket Output");


		// execute program
		env.execute("Flink Streaming Stateful Java Example");
	}
}
Between line 14-18 we configured our application to keep its state at file system with Rocksdb state backend. I set the check interval 2 seconds for test purposes. At line 18, we specified that even we cancelled the job, state should be retained. I kept the state cause I’ll show you how to re-deploy application that continuous from existing state. I won’t go details of this configurations too much because more detailed different settings depend on your program flow. The important part here is that we set explicitly we want to keep our state at the file system with a Rocksdb state backend. Further information can be found here.
The rest of the code defines how our pipeline process events. I wanna mention some important part here, at the end of some functions I set parallelism explicitly. For example, at the first stage of our code I set parallelism to one cause I will use netcat for the socket listening part and It can not listen tcp connections in broker mode. If the source was different like Kafka, it wouldn’t be problem. It is similar for the output socket sink.
Note: If you deploy an application that requires more task resources than the cluster has, deployment stucks at starting. I had similar problem when I want to deploy an app unless I change the taskmanager.numberOfTaskSlots number more than my application requirements in the flink-conf.yaml.
An other important point is we set the event time to ProcessingTime which is directly related with our windowing function selection. We used SlidingProcessingTimeWindows which doesn’t work with EventTime. However, we can still override watermark settings with custom implementation to overcome this but this is not necessary in our example.
In this example, there are two different flat-map implementation which are mapping socket text stream data to flink’s tuple class type.The type Tuple is preferred just for development purposes. If you want, you can implement your own custom POJOs.
public class WordStreamParser implements FlatMapFunction<String,Tuple2<String,Integer>>{
	@Override
	public void flatMap(String s, Collector<Tuple2<String,Integer>> collector) throws Exception{
		for(String word : s.trim().split(" ")) {
			collector.collect(Tuple2.of(word, 1));
		}
	}
}
Here, we split string to words and assign each word 1.
public class FilterStreamParser implements FlatMapFunction<String,Tuple2<String,Boolean>>{
	@Override
	public void flatMap(String s, Collector<Tuple2<String,Boolean>> collector) throws Exception{
		String[] strVals = s.split("=");
		if(strVals.length == 2){
			String key = strVals[0];
			Boolean val = strVals[1].equals("1") || strVals[1].equals("true");
			collector.collect(Tuple2.of(key, val));
		}
	}
}
Here we defined a scheme that works only when the input is in the format of
-> word=0
-> word=1
-> word=true
Now it’s time to explain how are we going to join these two streams together while we keep the current state sync. Let me explain this with the code
public class JoinProcessFunction extends CoProcessFunction<Tuple2<String,Integer>,Tuple2<String,Boolean>,Tuple2<String,Integer>>{
	private ValueState<FilterState> state;

	@Override
	public void open(Configuration parameters) throws Exception{
		ValueStateDescriptor<FilterState> desc = new ValueStateDescriptor<>(
				"filterState",
				FilterState.class, new FilterState(true)
		);
		state = getRuntimeContext().getState(desc);
	}

	@Override
	public void processElement1(Tuple2<String,Integer> input, Context context, Collector<Tuple2<String,Integer>> collector) throws Exception{
		String key = input.f0;
		FilterState current = state.value();
		if(current.Active) collector.collect(input);//filtering place
	}

	@Override
	public void processElement2(Tuple2<String,Boolean> input, Context context, Collector<Tuple2<String,Integer>> collector) throws Exception{
		FilterState current = state.value();
		current.Active = input.f1;//set state value
		state.update(current);
	}
}
The co-process function is bound two different inputs. In our case, processElement1 is called whenever we receive an event from word stream socket and it checks whether the word is activated or not. The function class manages the life cycle of the state. Before we connected two stream together we called keyBy function to distribute tasks based on the key which is word. When we called state.value() we get state of the key that we set with the keyBy. Second input ( filter stream ) only updates the state itself. It doesn’t emit any data.This is really nice capability. You can implement any low level join or other stateful processing functions. The flink api itself takes care of distributing the state among the task managers. So you just focus on your application business logic. More detailed information can be found here.
Deployment & Running
So far, we’ve have explained what is our application about and mentioned some apis of the Flink. Now, we’ll deploy and run our application. We’ll use flink cli to deploy and run our application after we compiled application artifacts.
mvn package
It will build com-streaming-example-1.0.jar file in the target directory.
Before sending our job to flink we need to open socket listeners. I’ll use netcat tool for the running tcp listener on my local environment.
nc -L localhost -p <port> // filter stream
nc -L localhost -p <port> // word stream
nc -L localhost -p <port> // output sink
After we run our tcp listeners, we can send our application to flink local cluster with command below. In my demo I preferred port 9002, 9003 and 9004.
bin\flink run -c com.sinanbir.example.StreamingJob <com-streaming-example-1.0.jar - Path> --portStream <port> --portFilterStream <port> --portSink 9004 --host <host> --stateDir <statedirectory path file:///>
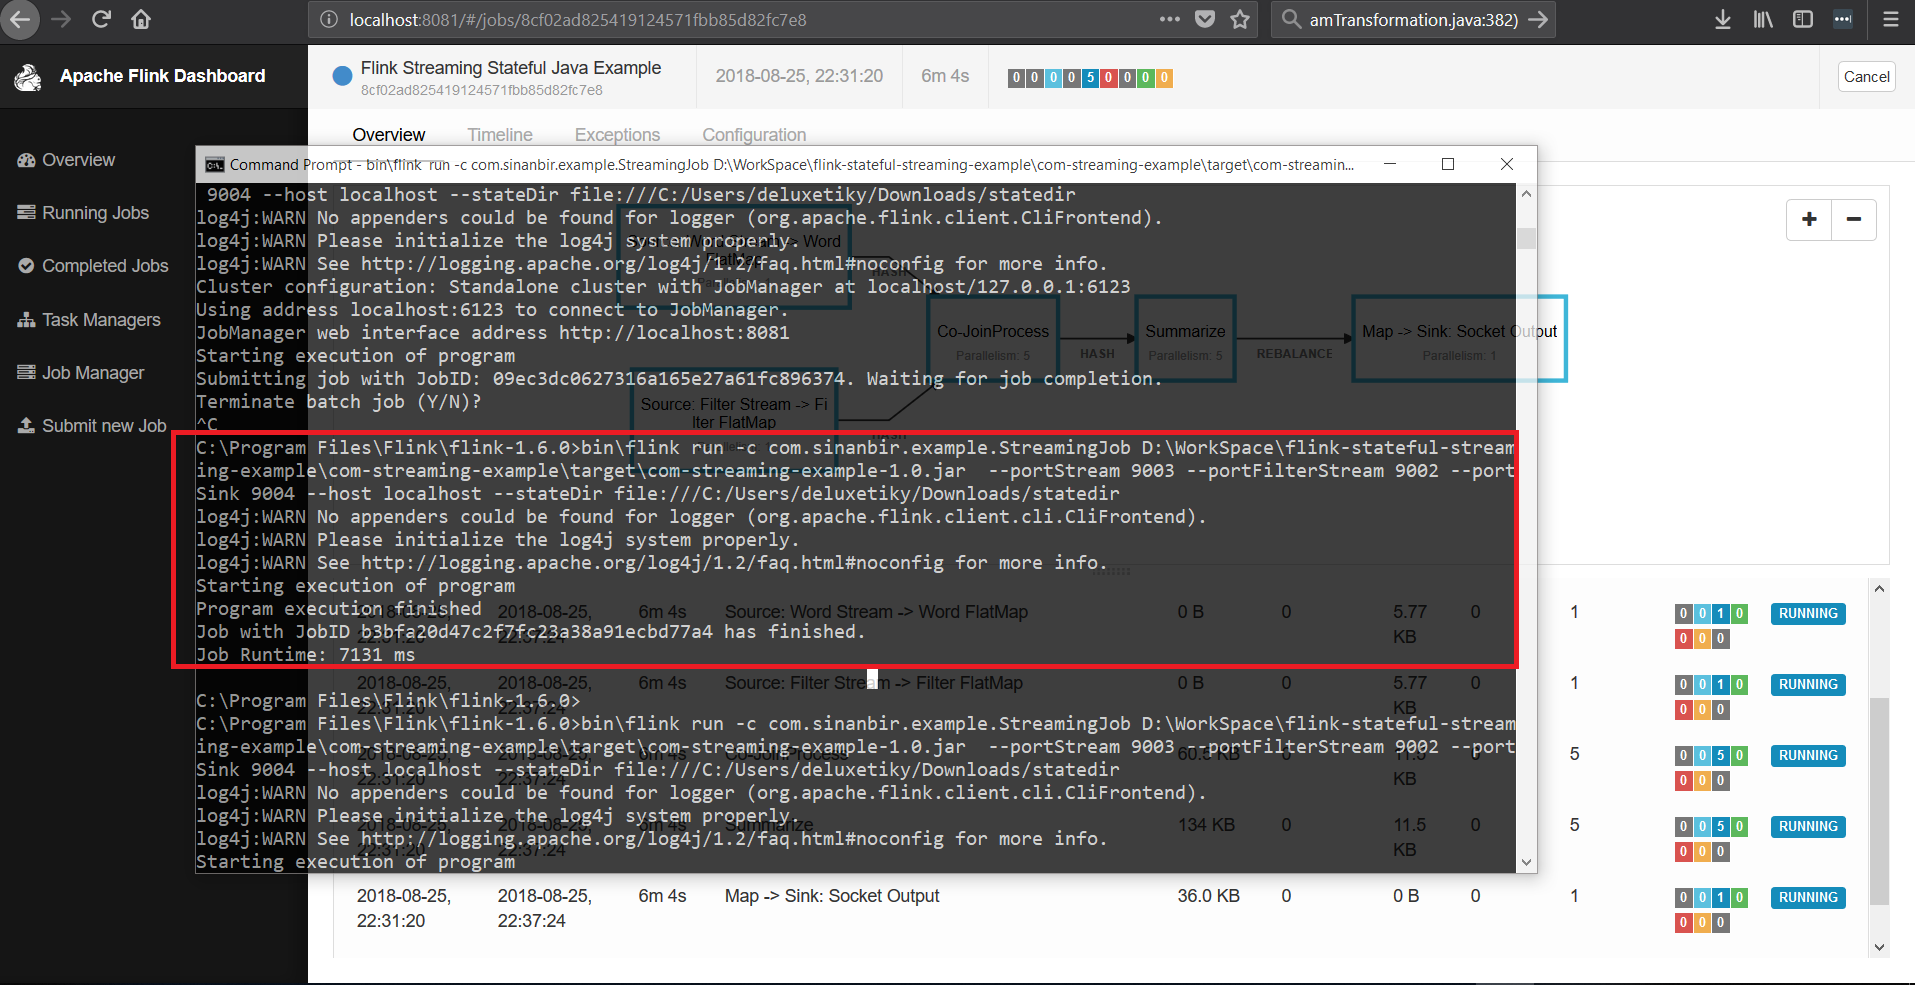
Now our job has been submitted successfully.ıf your application doesn’t start, make sure that all of the listeners are working properly.
Now,It’s time to test our stream pipeline.
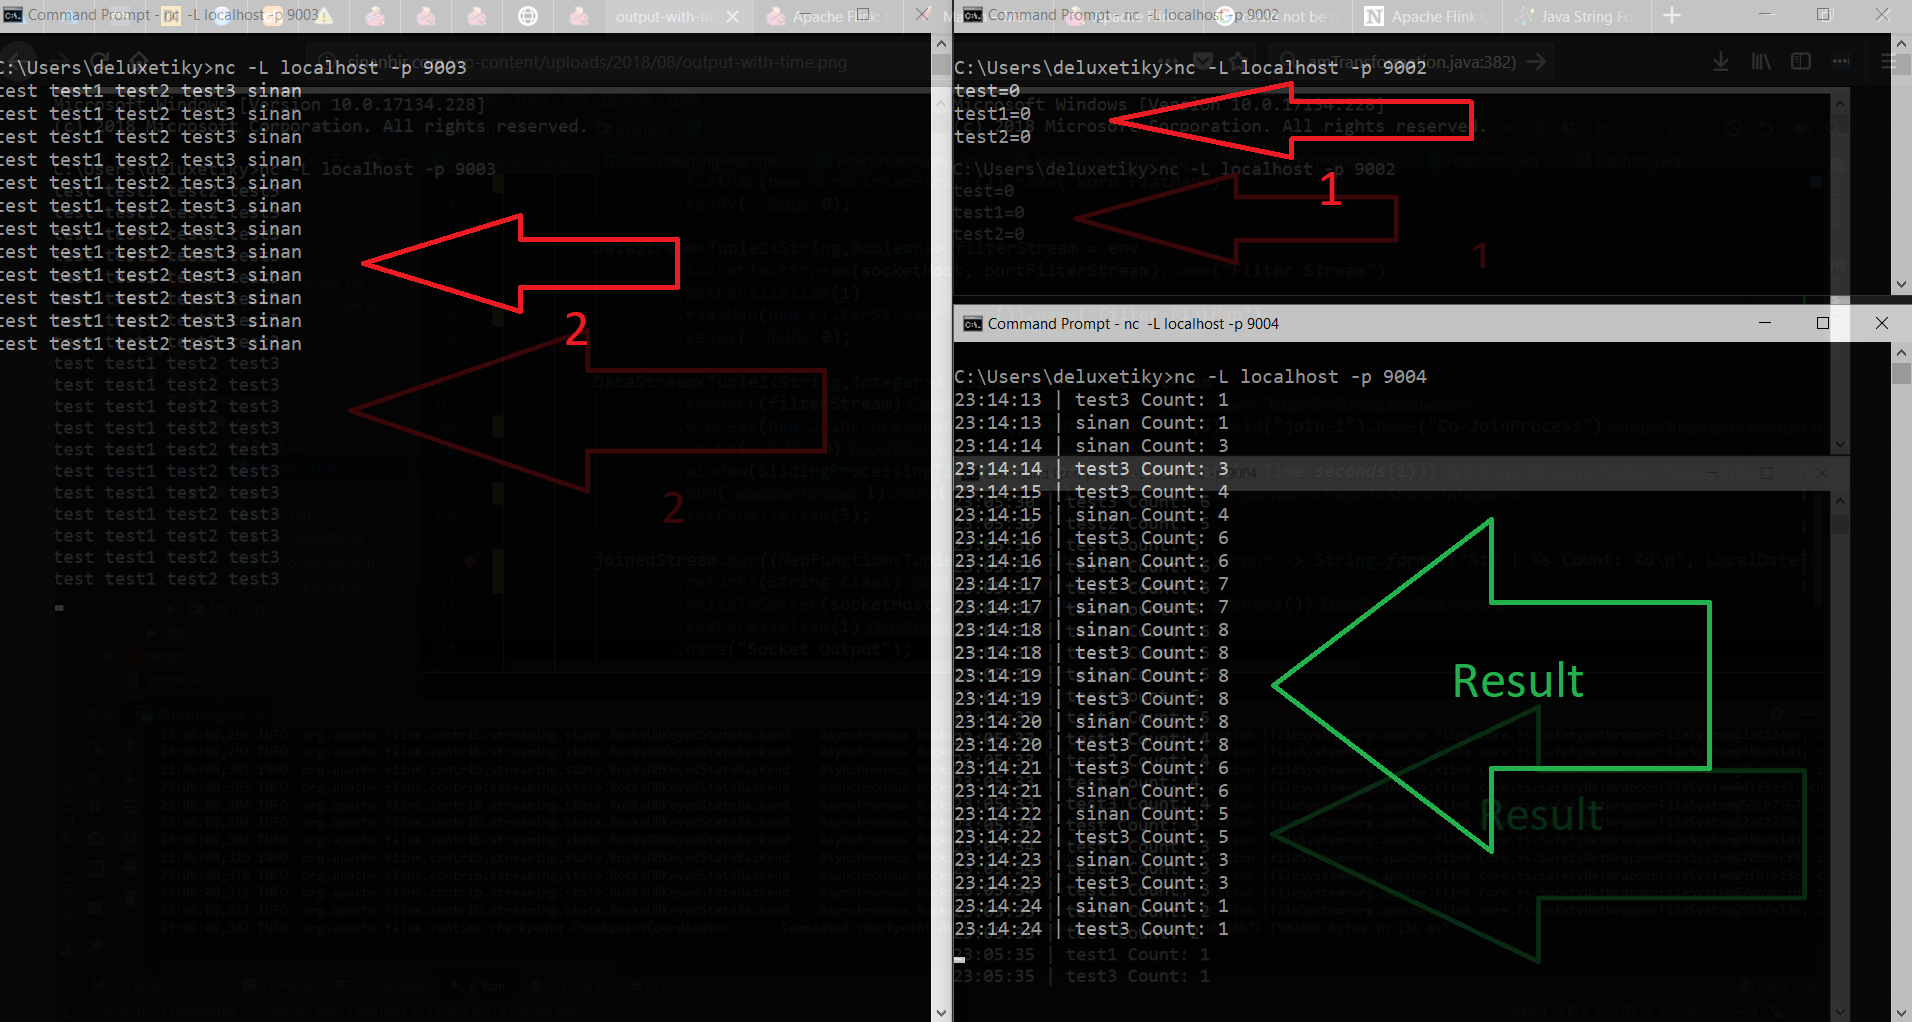
As you can see the words which have been disabled are not buffered to window summarize function and sliding window results are as expected.
In an other article I’ll show an example of how to redeploy an existing application and run it from its previous state.
You can access all of the code base from here.
Leave a Reply